Previous

Next
Home > Creating Applications > Understanding Page-Level Items > Editing Page-Level Items
 Previous |
 Next |
You can edit page-level items by editing page item attributes or using the Edit All or Reorder Items icons.
Topics:
Once you create a page item, you can edit it on the Edit Page Item page.
To edit page item attributes:
Navigate to the appropriate Page Definition. See "Accessing the Page Definition".
Access the attributes page for the item:
Tree view - Right-click on the item and select Edit.
Component view -Under Items, select the item name.
|
Tip: You can also edit an item by double-clicking the item name or selecting the name and pressing ENTER. See "Editing a Page in Tree View". |
The Edit Page Item page appears.
To learn more about a specific attribute on a page, click the attribute label.
When help is available, the item label changes to red when you pass your cursor over it, and the cursor changes to an arrow and question mark. See "About Field-Level Help".
Click Apply Changes.
The Edit Page Item page is divided into sections. The sections that display depend upon the Display As attribute.
You can access these sections by scrolling down the page, or by clicking a navigation button at the top of the page. When you select a button at the top of the page, the selected section appears and all other sections are temporarily hidden. To view all sections of the page, click Show All.
You define default values for an item using the attributes under Default on the Edit Page Item page. The default value is used when the item's value is not derived from session state and when the source value is NULL.
To define a default value for an item:
Create the item. See "Creating Page-Level Items".
Navigate to the appropriate Page Definition. See "Accessing the Page Definition".
Access the attributes page for the item:
Tree view - Right-click on the item and select Edit.
Component view -Under Items, select the item name.
The Edit Page Item page appears.
Scroll down to Default.
In Default Value, enter a value.
From Default Value Type, select one of the following:
Static Text with Session State Substitutions
PL/SQL Function Body
PL/SQL Expression
Click Apply Changes.
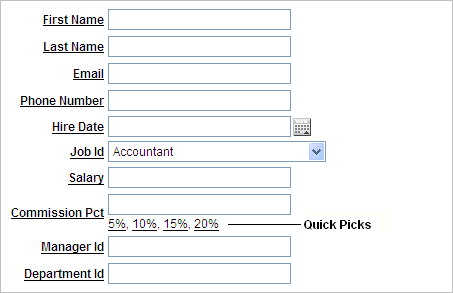
If the item type supports quick pick selection, use the Quick Picks attributes to define up to ten selections that display under a give item. Clicking on a quick pick sets the value of item. The following example shows quick picks for 5%, 10%, 15%, and 20%.

To create a quick pick:
Create the item. See "Creating Page-Level Items".
Navigate to the appropriate Page Definition. See "Accessing the Page Definition".
Access the attributes page for the item:
Tree view - Right-click on the item and select Edit.
Component view -Under Items, select the item name.
The Edit Page Item page appears.
Scroll down to Quick Picks.
From Show Quick Picks, select Yes.
Define the Label and Value for each quick pick:
Under Label, enter the label to display for each selection.
Under Value, enter the corresponding value.
In Link Attributes, enter additional attributes for the quick picks.
Click Apply Changes.
Item attributes control how items display on a page. You can use the Page Items page to edit the sequence, field label, template, region, and overall position for all items on a page. The sections that follow describe how to edit items using these pages.
Topics:
To edit multiple items simultaneously:
Navigate to the appropriate Page Definition. See "Accessing the Page Definition".
Access the Page Items page:
Tree view - Right-click Items and select Edit All.
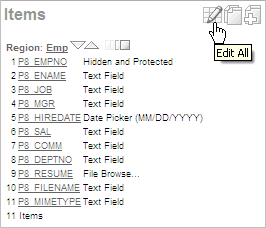
Component view - Under Items, click the Edit All icon. The Edit All icon resembles a small grid with a pencil on top of it.

The Items tab appears.
A Navigation bar displays at the top of the page. Use the Page field to navigate to another page. To limit the display to just items in a specific region, make a selection from Regions list.
The Page Items page displays items in an editable report. Table: Editable Attributes on Page Items describes each editable attribute.
Editable Attributes on Page Items
| Attribute | Description |
|---|---|
|
Sequence |
Specify the display sequence for this component. The sequence determines the order of evaluation. |
|
Prompt |
Enter the label for this HTML form element. You may include HTML, JavaScript, and shortcuts. You can also use the substitution string #CURRENT_ITEM_NAME# to obtain the name of the item associated with this label. |
|
Field Template |
Determines the label template. Label templates enable you to define the user interface attributes in a central place and share that definition among many labels. |
|
Region |
Defines the region in which the item displays. All items must be in a region. |
|
New Line |
Determines whether this item displays on the same line as the previous item or whether it displays on the next line. Items are laid out in an HTML table. Select Yes to have an item display as the first field in a new row in the table. |
|
New Field |
If set to Yes, this item will be rendered into it's own HTML table cell which is the default. If set to No, the item will be rendered into the same HTML table cell as the previous page item. Note that rendering into the same table cell will look more attached to the previous page item. |
|
Width |
Specifies the length (in characters) of the form element that displays for this item. |
|
Height |
Specifies the height (in lines) for text areas and multi select lists. |
|
Column Span |
Items are laid out in HTML tables. This property defines the value to be used for the |
|
Row Span |
Items are laid out in HTML tables. The attribute determines the value to be used for the |
|
Post Element |
Text or HTML code will be rendered immediately after the page item element. |
Use the Reassign Region Items page to assign items to a new region.
To Reassign Region Items page:
Navigate to the appropriate Page Definition. See "Accessing the Page Definition".
Access the Page Item page:
Tree view - Right-click Items and select Edit All.
Component view - Under Items, click the Edit All icon. The Edit All icon resembles a small grid with a pencil on top of it.
The Page Item page appears.
Click Reassign Region Items.
The Reassign Region Items page appears.
Use the Navigation bar at the top of the page to narrow or broaden the display. Available options include:
Page - Select or enter a new number and click Go.
Show Region(s) - Select a region to display and click Go.
To reassign an item to another region:
Select the items to reassign.
From Assign to Region, select a new region.
Click Reassign.
|
Tip: In Tree view, you can also reassign region items by simply dragging and dropping to a new location. |
Use the Delete Multiple Items page to delete multiple items at once.
To delete multiple items:
Navigate to the appropriate Page Definition. See "Accessing the Page Definition".
Access the Page Item page:
Tree view - Right-click on Items and select Edit All.
Component view - Under Items, click the Edit All icon. The Edit All icon resembles a small grid with a pencil on top of it.
The Page Item page appears.
Click Delete Multiple Items.
The Delete Multiple Items page appears.
Use the Navigation bar at the top of the page to narrow or broaden the display. Use the Page field to navigate to a new page. Select or enter a new number and click Go.
To delete an item:
Select the items.
Click Remove Items.
The Utilities page includes Grid Edit pages and reports Utilities that enable you to edit multiple pages within a selected application.
To access the Utilities page:
Navigate to the appropriate Page Definition. See "Accessing the Page Definition".
Access the Page Item page:
Tree view - Right-click on Items and select Edit All.
Component view - Under Items, click the Edit All icon. The Edit All icon resembles a small grid with a pencil on top of it.
The Page Item page appears.
Select one of the following reports:
You can use the Drag and Drop Layout page to interactively reorder items within a given region, change select item attributes, create items, or delete existing items.
Topics:
You access the Drag and Drop Layout page by either:
Tree view - Under Page Rending, right-click on the region and select Drag and Drop Layout.
Component view - Under Items, click the Drag and Drop Layout icon.
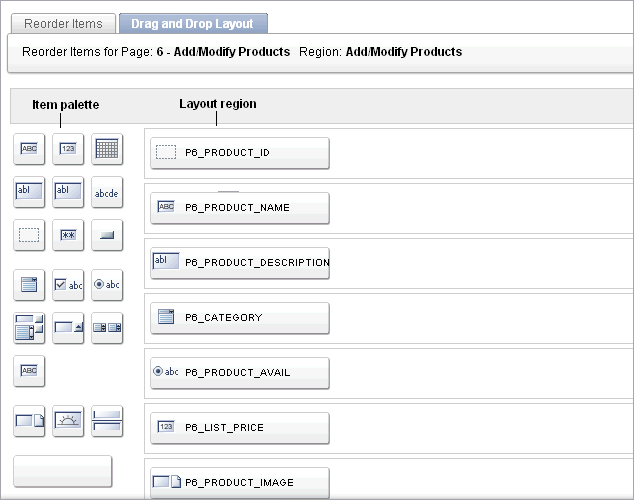
The Drag and Drop Layout page is divided into two sections: Item palette and Layout region.

The Item palette displays on the left side of the page. You add items by clicking an item type on the palette and dragging it to the correct position in the Layout region. Note that when you position the cursor over an item type, a tooltip appears.
Use the right side of the page (or Layout region) to position items. To move an item vertically, click the Add Row button to insert an empty row. Then drag and drop the item into the empty row.
To create a new item on the Drag and Drop Layout page:
Navigate to the Drag and Drop Layout page. See "Accessing the Drag and Drop Layout Page".
Click an item type in the Item palette on the left side of the page and drag it to the appropriate location in the Layout region.
Note that when you position the cursor over an item type, a tooltip appears.
You can reposition the item:
To move an item horizontally, select the item and drag it to the appropriate position on the page.
To insert an existing or new item between two existing rows, click the Add Row button and drag it between the existing rows. This creates an empty row where you can then move the item.
Edit the item attributes at the of the page.
Display Name - Enter an item name. Use this name to retrieve the value of the item. Item names longer than 30 characters cannot be referenced using bind variable syntax.
Label - Enter the label for this item. You may include HTML, JavaScript, and shortcuts. You can also use the substitution string #CURRENT_ITEM_NAME# to obtain the name of the item associated with this label.
Display Type - Select a display type (if applicable). Note that the select list is restricted to options corresponding to the type of item you are creating. See "About Item Types".
Click Next.
Optionally, edit the each item's Name and Label.
Click Apply Changes.
To edit an existing item on the Drag and Drop Layout page:
Navigate to the Drag and Drop Layout page. See "Accessing the Drag and Drop Layout Page".
To reposition the item:
To move an item horizontally, select the item and drag it to the appropriate position on the page.
To insert an existing or new item between two existing rows, click the Add Row button and drag it between the existing rows. This creates an empty row where you can then move the item.
If required, select an item and edit its attributes at the of the page.
Display Name - Enter an item name. Use this name retrieve the value of the item. Item names longer than 30 characters cannot be referenced using bind variable syntax.
Label - Enter the label for this item. You may include HTML, JavaScript, and shortcuts. You can also use the substitution string #CURRENT_ITEM_NAME# to obtain the name of the item associated with this label.
Display Type - Select a display type (if applicable). Note that the select list is restricted to options corresponding to the type of item you are creating. See "About Item Types".
Click Next.
Optionally, edit the each item's Name and Label.
Click Apply Changes.
|
Note: To change the region in which an item resides, you must edit the item attributes. See "Editing Page Item Attributes". |
To delete an item, click it and drag it to the Recycle box at the bottom of the page. If you delete an existing item, it appears in the Recycle box and can be retrieved until you click Apply Changes on the next page. Note that if you drop a new item you have just created in the Recycle box, it instantly disappears and cannot be retrieved.
You can quickly edit the label and position of items in a region by clicking the Reorder Region Items icon on the Page Definition. This icon resembles a gray down and up arrow.
To use the Reorder Region Items icon:
Navigate to the appropriate Page Definition. See "Accessing the Page Definition".
Under Items, click the Reorder Region Items icon.
The Reorder Region Items page appears with items laid out in tables. You can edit the position of an item by selecting values for New Line, New Field, Column Span, and Label Alignment attributes.
To edit an item label, enter a new title in the Label field.
To change the position of an item, edit the following attributes:
New Line. Determines if the item displays on the same line as the previous item, or displays on the next line. Select Yes to have an item display as the first field in a new row in the table.
New Field. Determines if the item displays in the next column or in the same column as the previous item. Select Yes to have the label and value for the item display in a new HTML table cell. Use this attribute in combination with the New Line and Span attributes to control layout.
Column Span. Defines the value to be used for the COLSPAN attribute in the table cell. The COLSPAN attribute defines the number of columns that it spans across the table.
To change label alignment, make a selection from the Label Alignment list.
To change the order in which items display, click the up and down arrows in the far right column. Clicking the arrow moves the item one row up or down.
Note that the order you specify here translates to sequence number in the Sequence attribute on the Edit Page Item page. See "Editing Page Item Attributes".
Click Apply Changes.
|
Tip: You can also use the Drag and Drop Layout feature to reorder items. See "Using the Drag and Drop Layout Page". |
|
Note: To change the region in which an item resides, you must edit the item attributes. See "Editing Page Item Attributes". |