Previous

Next
Home > Building Your Application > Linking a Column Value to A...
 Previous |
 Next |
In this exercise, you add a link to the Number of Employees column on the Departments report that navigates the user to the Employees report. It also sets the focus to the selected department. The column link includes a Clear Interactive Report command, CIR, to clear the Employees report, when shown, of any filters, control breaks, highlights, aggregates, computed columns, chart settings and flashback settings.
Topics:
To make this change, you edit the report attributes on the Departments report to change the value for the Number of Employees column to a link.
To change the column value to a link:
Click the Application ID link on the Developer toolbar.
Click 2 -Departments.
Under Regions, right-click Departments and select Edit Report Attributes.
The Report Attributes page appears.
Locate the Column Attributes section.
In the Column Attributes section, click the Edit icon next to Number of Employees.
Scroll down to the Column Link section.
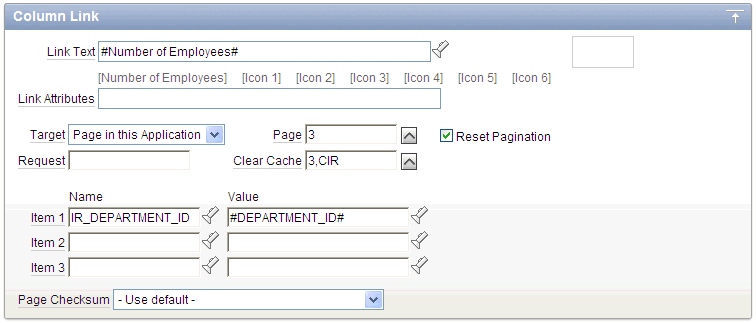
Under Column Link, make these changes:
Page - Enter 3.
Select the Reset Pagination check box.
Clear Cache - Enter:
3,CIR
The 3 means the cache for page 3 is cleared and the string CIR clears the Employees interactive report of any filters, control breaks, highlights, aggregates, computed columns, chart settings or flashback settings when the report is displayed.
|
Note: If you want to reset the interactive report to the default report settings instead of clear the report, replaceCIR with RIR. The last saved default report settings are applied to the interactive report. |
Item 1, Name - Enter IR_DEPARTMENT_ID
By prefixing the item name with IR_, the URL item will be associated with an interactive report column rather than an item on the page.
Item 1, Value - Select #DEPARTMENT_ ID#
The Column Link section shows all the options you selected.

In summary, these options enable the following behavior when the end user clicks the link:
The end user is navigated to page 3 of the Employees report.
On the Employees report, the selected department is in focus.
The Employees report is cleared. This means any filters, control breaks, highlights, aggregates, computed columns, chart settings or flashback settings are removed.
The user is returned to the first set of employee records when the user selects another department.
Click Apply Changes.
Note that in the Column Attributes section, the Number of Employees row contains a check mark in the Link column, reflecting the change you just made.
Now, run the report and test the Number of Employees column link from the Departments report. The Employees report is displayed showing all employees that belong to the selected department.
Click the Run Page 2 icon.
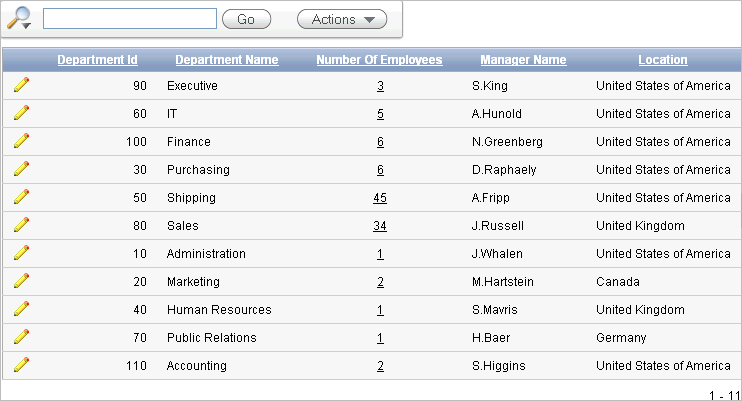
The Departments report is displayed. Note that end users can now drill down on the data in the Number of Employees column.

In the Number of Employees column, click the 3 for the Executive row.
All employees that belong to the Executive department appear in the Employees report.

The Department Id filter is displayed because this report is filtered by the Department Id value for the Executive department, 90, passed to this report from the Departments report. Notice the Clear Interactive Report command is included at the end of the URL in your browser, as shown in this example:
f?p=9257:3:3672543193352902::NO:RP,3,CIR:IR_DEPARTMENT_ID:90
This exercise demonstrates how to use the CIR command to clear a highlight before displaying the Employees report. To show this, you highlight any rows containing the first name of Neena, then display the Employees report from the Number of Employees column on the Departments report.
To highlight rows in the Employees report:
Click the Actions menu and select Format and then Highlight.
The Highlight options appear.
For Highlight options make these changes:
Name - Enter Neena
Background Color - Select [yellow]
Text Color - Select [red]
Column - Select First Name
Operator - Select =
Expression - Select Neena
Click Apply.
The Employees report appears with the row for Neena highlighted.

Click the Home breadcrumb.
Click Departments link.
Click Number of Employees in the Executive row.
The Employees report is displayed with the highlighting cleared, due to the CIR command specified in the column link.
Next, remove the filters you just created.
Click the Remove Filter icon to the right of DepartmentID = 90.
Click the Remove Highlight icon to the right of Neena.
Click Application ID on the Developer toolbar.