Previous

Next
Home > Accessing Your Development ... > Setting Up Your Own Local E...
 Previous |
 Next |
Instead of using the hosted demo environment, you can install Oracle Application Express locally. If you do a local installation, you must set up your development environment. The general steps you must perform include:
Install Oracle Application Express as described in Oracle Application Express Installation Guide.
Log in to Application Express Administration Services, as described in "Logging In to Administration Services".
Create a workspace, as described in "Creating a Workspace".
(Optional) Create additional users with developer or administrator privileges, as described in "Creating Additional User Accounts".
|
Note: This tutorial explains a simplified method for setting up your development environment so that you can begin using Oracle Application Express. However, when you want to set up your development environment to accommodate your real-life development needs, review “Oracle Application Express Hosted Instance Administration" in Oracle Application Express Administration Guide. |
To set up your local development environment, you first must log in to Oracle Application Express Administration Services. This is a separate application for managing an entire Oracle Application Express instance.
To log in to the Oracle Application Express Administration Services:
In a Web browser, go to the Oracle Application Express Administration Services application. Depending on which setup you are using, Oracle Application Express is installed in one of these locations:
If your setup uses the embedded PL/SQL gateway:
http://hostname:port/apex/apex_admin
Where:
hostname is the name of the system where Oracle XML DB HTTP Server is installed.
port is the port number assigned to Oracle XML DB HTTP Server. In a default installation, this number is 8080.
apex is the database access descriptor (DAD) defined in the configuration file.
For users who have upgraded from earlier versions, or who have a custom configuration, this value may be htmldb or something else. Verify your DAD with your Oracle Application Express administrator.
|
See Also: "Verifying the Oracle XML DB HTTP Server Port" in Oracle Application Express Application Builder User's Guide |
If your setup uses the Oracle Application Express Listener, go to:
http://hostname:port/apex/apex_admin
Where:
hostname is the name of the system where Oracle HTTP Server is installed.
port is the port number assigned to Oracle HTTP Server. In a default installation, for Oracle WebLogic Server this number is 7001, in OC4J this number is 8888, in Oracle Glassfish Server this number is 8080. These defaults are correct at the time this document was written. Please review the related Web server documentation for the latest default port if necessary.
apex is the mount point defined in the Web Server configuration file.
|
See Also: Oracle Application Express Listener documentation |
If your setup uses the Oracle HTTP Server (Apache) with mod_plsql:
http://hostname:port/pls/apex/apex_admin
Where:
hostname is the name of the system where Oracle HTTP Server is installed.
port is the port number assigned to Oracle HTTP Server. In a default installation, this number is 7777. You can find information about your Oracle HTTP Server installation's port number from either of the following files:
ORACLE_BASE\ORACLE_HOME\install\portlist.ini

ORACLE_BASE\ORACLE_HTTPSERVER_HOME\Apache\Apache\conf\httpd.conf
Be aware that if you change a port number, it is not updated in the portlist.ini file. You can only rely on this file immediately after installation.
pls is the indicator to use the mod_plsql cartridge.
apex is the database access descriptor (DAD) defined in the mod_plsql configuration file.
For users who have upgraded from earlier versions, or who have a custom configuration, this value may be htmldb or something else. Verify the DAD with your Oracle Application Express administrator.
|
See Also: "Managing Oracle Database Port Numbers" in Oracle Application Express Installation Guide andORACLE_BASE\ORACLE_HTTPSERVER_HOME\Apache\modplsql\conf\dads.readme for more information on database access descriptors |
The Login page appears.
In Username, enter the username you specified when you installed Oracle Application Express.
In Password, enter the Oracle Application Express administrator account password you specified when you installed Oracle Application Express.
Click Login.
Oracle Application Express Administration Services appears.
From Administration Services, create a workspace. A workspace is a shared work area within the Oracle Application Express development environment that has a unique ID and name. All users in the workspace can access all its applications and scripts. For more information about workspaces, see "About Workspaces".
To create a workspace:
Log in to Oracle Application Express Administration Services.
The Instance Administration Home page appears.
Click Manage Workspaces.

Under Workspace Actions, click Create Workspace.
The Create Workspace Wizard appears.
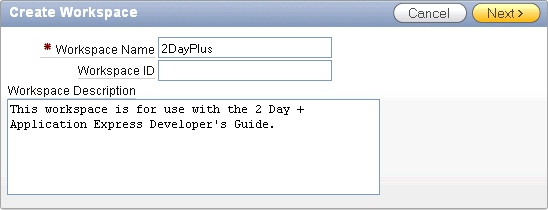
For Identify Workspace, enter the following:
Workspace Name - Enter a unique workspace name. This guide uses 2DayPlus for the workspace name.
In general, you want to enter a workspace name that is significant to you. For example, you might enter your own name, your company name, or the name of the project or department to which your application pertains.
If you want to use the same name for both your workspace and schema, enter a workspace name that contains only alphabetic characters. Schema names are restricted to alphabetic characters.
Workspace ID - Leave Workspace ID blank to have the new Workspace ID automatically generated. A Workspace ID must be a positive integer greater than 100000.
Workspace Description - Enter a workspace description.
Click Next.

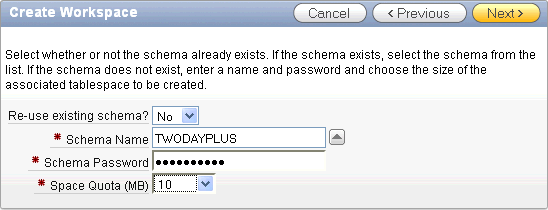
For Identify Schema, enter the following:
Re-use existing schema - Select No if you are creating your first workspace.
A schema is a logical container for database objects. In this step, you are creating the container for database objects you add later in this tutorial.
Schema Name - Enter a schema name. This guide uses TWODAYPLUS for the schema name.
You must use only alphabetic characters in your schema name.
Schema Password - Enter a case-sensitive password.
Space Quota (MB) - Select at least 10 MB to accommodate the necessary space for creating the objects required for this guide.
Click Next.

For Identify Administrator, enter the following:
Administrator Username - Accept the default, ADMIN, or enter another user name to be used in Oracle Application Express.
You are creating an account for only one user, yourself as an administrator. To see instructions for creating additional users, see "Creating Additional User Accounts".
Administrator Password - Enter a case-sensitive password.
Enter the remaining information, including your valid email address, and click Next.
The login credentials for accessing Oracle Application Express are sent to the email address you enter here, if you have configured the email settings for your Oracle Application Express environment.

Confirm your selections and click Create Workspace.
To log in to your local instance of Oracle Application Express, you must have this information:
URL where you can access Oracle Application Express
Workspace name you use to develop applications
Username set up for you for this workspace within Oracle Application Express
Password set up for you for this workspace within Oracle Application Express
If you set up your development environment, you have your login credentials. Otherwise, contact the person who created your user account to supply the information.
To log in to Oracle Application Express:
In a Web browser, go to the Oracle Application Express Login page. Depending on your setup, Oracle Application Express installs to one of these locations:
If your setup uses the embedded PL/SQL gateway or the Oracle Application Express Listener:
http://hostname:port/apex
If your setup uses the Oracle HTTP Server (Apache) with mod_plsql:
http://hostname:port/pls/apex
For an explanation of the URLs, see "Logging In to Administration Services".
The Login page appears.
Under Login, enter your login credentials.
Click Login.